Monday, April 18, 2016

Paper Flowers Shadow Box


I love old books and paper so I thought this project would be great to use up some books I've saved. Confession... I have a huge stack of books I've been saving for something like this and I'm sure I will never use all of my "craft paper" collection.

Yay! Raggedy books!
Supplies:

1 shadow box (I bought mine from Ikea)
1 piece of scrapbook paper
Old books
Hot glue gun
Brads - optional (I bought mine from Emerald Creek Craft Supplies)
Thin silver wire - optional (I found mine in a piece of ribbon in a draw of old wedding decorations and thought, "Perfect! This is just what it need!")


1. Cut out a piece of scrapbook paper to the size of the shadow box. This will be the background in the shadow box and what you attach your flowers to. I picked a bright blue(which isn't showing up well in this picture, but looks great in real life!)

2. To make the flowers, cut out a circle. Cut a spiral in the circle, ending in the middle. 

3. Take the outside end and roll till you make it to the inside. Add a dab of glue inside the bottom to secure it. Hot glue works best since it sets fast. For another video tutorial, click here.
Just 40 more to go!

I wanted to add a bit more to the box by making a couple of origami butterflies. I followed this tutorial here, but there are many more to choose from.

4. Arrange the flowers in the box and glue them down. I added some jeweled brads to the middle of some of the flowers(before gluing them down). You could add more or less flowers, depending on the look you want. I wanted to be able to see some of the background colour.

5. If you made a butterfly, you could also make some antennae for them. I took a piece of ribbon that had wire in it and cut the wire out. Then I curled it and glued to the butterfly. I also distressed my butterflies by rubbing the edges on some black and brown ink pads.


I'm entering my shadow box into these challanges:


Thursday, March 10, 2016

Spring Door Wreath


Spring!
I love spring! It's getting bright out and all the colours are coming back. My front door was looking a little dull so it was time to do something about that. I looked to Pinterest and Sprung Creations for inspiration and decided on a grapevine wreath with rolled fabric and lace flowers. 


Supplies:

1 Grapevine Wreath(I got mine at Michael's)
Ribbon for bow(The cute burlap and lace was also from Michael's)
2" Fabric strips at least 15" long(longer for bigger flowers)
5"-7" Lace strips
Felt circles
Brads (I got mine from Emerald Creek Craft Supplies)
Hot glue gun

Rolled Fabric Flowers
1. Rip your fabric strips(yes, rip!) Make a small notch at the width you want and rip it the rest of the way. This will give it a neat frayed look with out having it unravel too much.

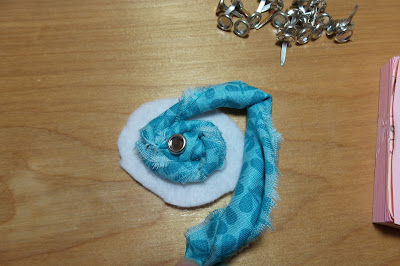
2. Have your felt circle ready and tie a knot at one end of your fabric strip. 

3. Insert the brad through the knot and glue to the felt.

4. Start twisting the fabric and gluing in a circle around the center.

 5. When you have reached the size you want, trim and glue the end onto the back. For a clean look, glue another felt circle on the back to cover the end.

Ta dah!
Lace Flowers
1. Take a strip of lace and start to ruffle the middle into a circle, gluing down each ruffle.

2. Once you have it mostly circular, glue the ends together. Different lace may look better connected different ways. This one worked best with gluing the 2 fronts together with a thin strip of glue right on the edge to have the ends in the back. Dab some glue in the middle and push brad through. Flip to back to fold the brad in place and add more glue if you have any loose ruffles. Add a piece of felt to finish it off.

Ta dah!

 Now they are ready to arrange them onto your wreath! 

Make a bow for the top or tie one directly to the wreath to hang from. I formed mine then added it to the wreath and used a different string to hang from.


Depending on the weather where you live, you could hot glue the flowers on(not recommended for cold weather) or use a strong glue, like Gorilla Glue, or stitch them on like I did.


I love my wreath so much that I'm entering it into these challenges:

Emerald Creek Dares: Ring in Spring Challenge
Decorate to Celebrate!